Search Results
387 results found with an empty search
- CARROT NUTS SALAD
▶Vegan <Yield> 2 servings 10 minutes 0 minutes 2 large Carrot(300g) ½cup roasted almond /walnuts/ cashew nuts OR 2 tbsp of ground sesame seeds 1 tbsp balsamic vinegar 1 tsp soy sauce 1 tbsp any neutral oil ½ tsp salt ★Find Japanese ingredients here . 1. Shred carrot into match thin sticks. Sprinkle some salt and massage. Leave it for 5 mins. Squeeze the moisture. Crush some nuts into bits. 2. Into the carrot, add oil. Toss it to coat. Add balsamic vinegar, soy sauce and crushed nuts. Toss them all together. ※Watch more on YouTube! Use any nuts you like. I like to add substantial amount of them. For oil, I like to use flaxseed oil. Olive oil and avocado oil are good options. Make sure to squeeze the moisture as much as possible on step1. It will prevent the salad from getting water down. Store in an air-tight container in the fridge for up to 5 days. This CARROT NUTS SALAD is great to be served in this tableware . - MIWA's E-cookboo k s are available! I hope this will be helpful and enjoyable in your kitchen^^ -(NEW) MIWA's Tableware is NOW live! Enhance Your Culinary Experience with MIWA's Tableware! Miwa's Favorite Picks : Perfect for starting your Japanese food journey at home. Ideal for Celebrations and Gifts : Beautiful designs that make any occasion special. Enlighten Your Table : Add elegance and tradition to your dining experience. ☆Join our IKIGAI COOKING CLUB (membership) to meet Japanese food lovers all over the world. This membership will help you to establish a healthy cooking habit by incorporating more Japanese cooking into your life! 2021/11/27 MIWA
- Raisin Amazake Ice cream /甘酒アイス
▲Vegan Ingredients: - 1 large ripe banana - 4 tbsp/ 100g Greek yogurt/ regular yogurt - 4 tbsp/100g amazake - 2 tbsp / 15g raisins - 1 ½ tablespoons maple syrup/ honey ★Find Japanese ingredients here . Instructions: 1 Add the maple syrup to a microwave-safe container and heat it at 600W for 20 seconds. Add the raisins and let them soak for 10 minutes. 2 In another container, add the ripe banana, Greek yogurt, and amazake. Mash the banana and mix everything well. 3 Add the raisins soaked in maple syrup(from step1) and mix again. Cover and freeze for at least 3 hours or until it’s frozen. 4 When ready to eat, let it thaw slightly until it's smooth enough to scoop with a spoon. Enjoy your delicious and healthy raisin banana amazake ice cream! Miwa's advice: 1:If the ice cream is too hard, microwave for about 20 seconds to soften it to the right consistency or leave it at the room temprature for 5-10 mins. 2: Greek yogurt creates a very creamy and rich texture.If you prefer a lighter texture, try using regular yogurt instead. 3: For those who are not used to it, amazake can have a distinct flavor at first. In that case, try reducing the amount of amazake and replacing it with your preferred sweetener to start. This Amazake Ice Cream is great to be served in this tableware . - MIWA's E-cookboo k s are available! I hope this will be helpful and enjoyable in your kitchen^^ -(NEW) MIWA's Tableware is NOW live! Enhance Your Culinary Experience with MIWA's Tableware! Miwa's Favorite Picks : Perfect for starting your Japanese food journey at home. Ideal for Celebrations and Gifts : Beautiful designs that make any occasion special. Enlighten Your Table : Add elegance and tradition to your dining experience.
- CHINESE CABBAGE SESAME SALAD
▶vegan <Yield> 4 servings 10 minutes 0 minutes 300g chinese cabbage 1/2 tsp salt Dressing 1 tsp soy sauce 1 tbsp mayo/ vegan mayo 1 tsp rice vinegar 1 tbsp toasted sesame seeds 1. Thinly slice chinese cabbage. Sprinkle some salt and massage. Let it sit for 5 mins, then squeeze the moisture as much as you can. 2. Ground toasted sesame seeds. To the container, add soy sauce, vinegar, mayo and toasted sesame seeds. Mix them together. 3. Toss 1&2. ※Watch more on YouTube! Remove the moisture of Chinese cabbage as much as possible. Feel free to adjust the taste by adding more soy sauce and mayo. Great for meal prep and bento box. Store in an air-tight container in the fridge for up to 4 days. - MIWA's E-cookboo k s are available! I hope this will be helpful and enjoyable in your kitchen^^ -(NEW) MIWA's Tableware is NOW live! Enhance Your Culinary Experience with MIWA's Tableware! Miwa's Favorite Picks : Perfect for starting your Japanese food journey at home. Ideal for Celebrations and Gifts : Beautiful designs that make any occasion special. Enlighten Your Table : Add elegance and tradition to your dining experience. ☆Join our IKIGAI COOKING CLUB (membership) to meet Japanese food lovers all over the world. This membership will help you to establish a healthy cooking habit by incorporating more Japanese cooking into your life! 2023/3/11 MIWA
- ODEN JAPANESE HOT POT
<Yield> 4 servings 15 minutes (does not include resting time) 40 minutes Bannou sauce/ 万能ソース 200ml (a little less than 1cup) soy sauce 200ml (a little less than 1cup) M irin 40g bonito flakes Oden soup 700ml(3 ¼ cup) water 110ml(½ cup) bannou sauce 10cm (5g) kombu Oden ingredients 1 inch thick ×7 daikon radishes ½ block (200g) konnyaku 6 pieces fish cakes 4 shiitake mushrooms 3 small-medium potatoes (300g) 1 leek (200g) ½ cup broccoli(150g) 5 cherry tomatoes Egg in fried tofu (Optional) 1 pieces fried tofu 2 eggs 3 tbsp cheese 2 stalks spring onion 1. To the large pot, add water and kombu. Soak it for at least 30 mins. 2. (make bannou sauce) Bring the mirin to a boil in a small pot. Once it comes to a boil,lower the heat.Keep it on low for 15- 30 seconds to burn off the alcohol.( Make sure there is no more smell of alcohol). Add soy sauce and bonito flakes. Once it comes back to a boil, off the heat immediately. Let it cook down.As the temperature goes down, the umami flavor seeps out to the sauce.Strain it over a piece of paper towel covering a strainer. Squeeze the bonito flakes in the paper towel and let the liquid drip down into a bowl.You can keep the sauce upto 2 weeks in a fridge. 3. (Prep Oden) -Chop daikon into 2 cm/ 1 inch thick. Score the surface(⅓ of its thickness) on one side allowing them to absorb more soup. -Remove the stem of shiitake mushrooms. -Cut fish cake into small bite size if it's too big. -Peel the skin of a potato and remove the eye. -Chop leeks into 4cm/ 2 inch length. -Chop broccoli into florets -Remove the stem of cherry tomatoes and peel the skin.( Watch on YouTube) 4 (Prep konnyaku) -Blanch konnyaku for 2-3 mins to remove the odor.Cut into big triangle shape.( Watch on YouTube) 5 (Prep egg in fried tofu) Place a single chopstick over the fried tofu then roll around from one side to the other by pressing. Cut the tofu in half and put your finger into the cut to open the tofu carefully. Remove the excess oil of fried tofu by patting with a paper towel. Open the fried tofu and stuff cheese inside. Drop one egg into the fried tofu. Tigh the opening with blanched spring onion or chives. 6. In to the kombu stock ( step1), add bannou sauce. Add daikon, potatoes, and leeks. Once it comes to a boil, lower the heat to low and close the lid. Simmer it for 25 mins. 7. Add the rest of the ingredients except for cherry tomato and broccoli. Continue to cook it on low for another 10 mins.Once everything is cooked,add cherry tomato and broccoli.Close the lid and wait for another at least 10 mins. Scoop your favorite ingredients along with a generous amount of soup. Enjoy with Japanese mustard if you want. ※Watch more on YouTube! 1. The ratio of soup is 1 bannou sauce : 6 water . Feel free to scale up and down. It' s a bit on the savory and salty side. Add more vegetables or splash more water if you want. 2. The ingredients I showed here are just an example. Feel free to change up. Sweet potatoes, cabbage, and other mushrooms are great options. 3. When you make bannou sauce, make sure to burn off the alcohol of mirin but try not to burn at the bottom. If you don’t smell any alcohol, it should be ok. Store in an air-tight container in the fridge for up to 3 days. This Oden is great to be served in this tableware . - MIWA's E-cookboo k s are available! I hope this will be helpful and enjoyable in your kitchen^^ -(NEW) MIWA's Tableware is NOW live! Enhance Your Culinary Experience with MIWA's Tableware! Miwa's Favorite Picks : Perfect for starting your Japanese food journey at home. Ideal for Celebrations and Gifts : Beautiful designs that make any occasion special. Enlighten Your Table : Add elegance and tradition to your dining experience. ☆Join our IKIGAI COOKING CLUB (membership) to meet Japanese food lovers all over the world. This membership will help you to establish a healthy cooking habit by incorporating more Japanese cooking into your life! 2023/2/18 MIWA
- TANGY SALMON SALAD
<Yield> 2 servings 15 minutes (does not include soaking time) 10 minutes 200g salmon fillet ¼cup sliced onion(100g) ½cup sliced paprika(80g) ½cup shredded carrot (100g) 2 tbsp potato starch / corn starch ¼ tbsp salt ½ tsp black pepper 1 tbsp oil Sauce 3tbsp S oy sauce 3tbsp rice vinegar 3tbsp M irin 1tbsp cooking sake/ rice wine 1. To the pot, add sake and mirin. Bring it to a boil, then lower the heat. Continue to simmer for 30 seconds to burn off the alcohol. ( Make sure to cook off until there is no alcoholic smell.)Off the heat. Add soy sauce and rice vinegar. Let it cool down. Transfer to the container. 2. Sprinkle some salt on salmon. Leave it for 10 mins until the salmon starts to sweat. Remove the moisture by tapping with a paper towel. Sprinkle some black pepper. 3. Chop carrot and paprika into thin matchsticks. Thinly slice onion. 4. Lightly Coat salmon with potato starch. Shallow fry with the oil until the skin side is slightly brown about 4 mins over mid high heat. Flip the salmon then add vegetables. Close the lid and steam it for another 5 mins on low heat. Transfer to the marinade. Let it sit in the fridge for 1 hour or overnight. ※Watch more on YouTube! 1. If you are sensitive to the tanginess, you can boil off the vinegar together with mirin and cooking sake. I recommend adding soy sauce after turning off the heat to retain the aroma. 2. Steaming vegetables is optional, but you can eat more vegetables by steaming them. 3. As the time passes , the bolder the flavor would be. Store in an air-tight container in the fridge for up to 3 days. This TANGY SALMON SALAD is great to be served in this tableware - MIWA's E-cookboo k s are available! I hope this will be helpful and enjoyable in your kitchen^^ -(NEW) MIWA's Tableware is NOW live! Enhance Your Culinary Experience with MIWA's Tableware! Miwa's Favorite Picks : Perfect for starting your Japanese food journey at home. Ideal for Celebrations and Gifts : Beautiful designs that make any occasion special. Enlighten Your Table : Add elegance and tradition to your dining experience. ☆Join our IKIGAI COOKING CLUB (membership) to meet Japanese food lovers all over the world. This membership will help you to establish a healthy cooking habit by incorporating more Japanese cooking into your life! 2023/3/11 MIWA
▶VEGAN <Yield> 2 servings 10 minutes 10 minutes 300g firm tofu 5 shiitake mushrooms 1 tbsp chopped ginger (10g) 2 cloves garlic 1 small onion (100g) 1 leek (100g) 1 tsp tobanjan paste 1 tbsp toasted sesame oil 2 servings pre-cooked ramen noodles/ udon noodles/ rice noodles (300g) 1 tsp high heat oil Seasoning 2 tsp sugar 2 tsp potato starch/ corn starch 2 ½ tsp soy sauce 2 tsp cooking sake 1 ½ tbsp red miso 1 tbsp tenmenjyan/ gochujang ½ tsp soup stock powder/ bouillon cube ⅓ cup water (70ml) Topping ( optional) cucumber coriander chopped green onion tomato 1. Remove the moisture from the tofu as much as possible by squeezing it or microwaving it at 600w for 3 mins (watch more on YouTube). Mince the ginger and garlic. Dice the shiitake mushrooms and onion into ½ inch cubes. Thinly slice the leeks. Mix all the seasoning in a bowl. 2.Cook the noodles according to their package instructions if your noodles aren't pre-cooked. Mine are already cooked, so I don’t show this process in the video. 3. Into a pan, heat 1 tsp of oil over medium heat. Add garlic and ginger. Let it infuse over low heat for 1 min. Add onion, leek and shiitake mushrooms. Bring the heat to high and cook for 3 mins. Add tobanjan paste and tofu. Continue to cook for another 2 mins. 4. Add all the seasonings listed above. Cook over medium heat until the sauce has thickened. Remove from heat and drizzle on the toasted sesame oil. 5. In a pan, add in toasted sesame oil. Cook noodles until both sides are lightly browned. Add in water and cover with a lid. Steam for 1-2 mins. Open the lid and let the excess water evaporate completely. Transfer to the plate. (This process is optional) 6. Pour the tofu sauce (Step 4) on top of the noodles. Garnish with your choice of toppings.Toss everything together and enjoy! If the sauce is not spicy enough, feel free to drizzle chili oil or add more tobanjan paste. If you don’t have access to noodles, enjoy it topped over rice! I highly recommend enjoying it with some fresh raw vegetables. Keep the noodles and sauce separately. You can keep the sauce in an air-tight container for up to 4 days in the fridge or 2 weeks in the freezer. - MIWA's E-cookboo k s are available! I hope this will be helpful and enjoyable in your kitchen^^ -(NEW) MIWA's Tableware is NOW live! Enhance Your Culinary Experience with MIWA's Tableware! Miwa's Favorite Picks : Perfect for starting your Japanese food journey at home. Ideal for Celebrations and Gifts : Beautiful designs that make any occasion special. Enlighten Your Table : Add elegance and tradition to your dining experience. 2023/9/02 MIWA
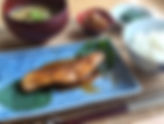
<Yield> 2 servings 10 minutes 8 minutes 2-3 slices salmon filet (300g) 1 tbsp salted butter ¼ tsp salt & pepper Sauce 1½ tbsp s oy sauce 1 tbsp-1 ½ tbsp rice vinegar 2 tbsp m irin 1 tsp lemon juice 1. Sprinkle the salmon filets with salt and pepper. Make sure to do it on both sides. Let it sit for 10 mins. Wipe off the moisture seeping out from the salmon to reduce the fishy smell. Mix all the sauce ingredients together. 2. Add cooking oil to the pan. Place salmon skin side down into the pan. Lower the heat and close with a lid. Steam it for 5 mins or until the skin is charred. 3. Flip the salmon and cook it for another 2 mins. Wipe off the oil with a paper towel as much as possible. Add sauce and butter. Let it cook for another 2 mins. Transfer the salmon to a plate. Deglaze the sauce until it’s thickened. Drizzle it over the salmon. Ready to be enjoyed! Steaming the salmon will keep it moist and result in a tender salmon. The key to success is ①not overcooking and ②wiping off the excess fish oil as much as possible before adding in the sauce. If you prefer less tangy, reduce the vinegar in half and add more mirin to your liking. Your kitchen might smell like vinegar. Please be prepare for it. Haha. Store in an air-tight container for up to 2 days in the fridge. This Teriyaki salmon is great to be served in this tableware - MIWA's E-cookboo k s are available! I hope this will be helpful and enjoyable in your kitchen^^ -(NEW) MIWA's Tableware is NOW live! Enhance Your Culinary Experience with MIWA's Tableware! Miwa's Favorite Picks : Perfect for starting your Japanese food journey at home. Ideal for Celebrations and Gifts : Beautiful designs that make any occasion special. Enlighten Your Table : Add elegance and tradition to your dining experience. 2022/10/21 MIWA
▶vegan <Yield> 2 servings 10 minutes 20 minutes 2 serving frozen udon noodles (300g) Soup base 2 ½ tbsp m irin 2 tbsp s oy sauce 1 dashi packet / 1 tsp dashi granules/ kombu dashi (if you are plant based) ⅛ tsp salt 2 ½ cups water (600ml) Seasoned Fried tofu 3 pieces thin fried tofu ½ cup water (150ml) 1 tb sp s oy sauce 1 ½ tbsp m irin 1 ½ tbsp rice wine 1 tsp sugar Toppings (optional) spinach chopped green onions wakame seaweed To make the soup base, add water and the dashi bag into a pot. Bring it to a boil then lower the heat and steep the dashi bag for 4 minutes. Shake the dashi bag and remove it from the pot. Add in the salt, soy sauce, and mirin. Return it to a boil then remove from heat. Have a taste and add more salt if it’s needed. Boil the frozen udon noodles according to the package instruction OR you can also microwave them at 600w for about 2-3 minutes. Rinse the noodles under the faucet after cooked and drain the water. Serve it in a soup bowl. Remove the excess oil from the fried tofu by pressing it with a paper towel. Cut the fried tofu in half. In a pot, place in the fried tofu and the ingredients listed under "Seasoning A". Simmer until all the liquid has evaporated. Pour the hot soup (step 1) over the udon noodles (step 2). Top it with the seasoned fried tofu along with your choice of toppings such as spinach and chopped green onions. Now it's ready to be enjoyed. If you make seasoned fried tofu ahead of time, you can whip up this recipe within 10 minutes. 2. Dashi bags and dashi granules contain some salt. Feel free to adjust the taste by adding more salt or less. 3. If you are plant based, use kombu dashi or dried shiitake dashi. Store seasoned tofu in an air-tight container for up to 3 days in the fridge. Soup and udon should be served right after you make it. - MIWA's E-cookboo k s are available! I hope this will be helpful and enjoyable in your kitchen^^ -(NEW) MIWA's Tableware is NOW live! Enhance Your Culinary Experience with MIWA's Tableware! Miwa's Favorite Picks : Perfect for starting your Japanese food journey at home. Ideal for Celebrations and Gifts : Beautiful designs that make any occasion special. Enlighten Your Table : Add elegance and tradition to your dining experience. 2023/11/11 MIWA
2 servings 5 minutes 10 minutes - 1 block (200g) firm tofu or thick fried tofu - half an onion (100g), sliced into 1cm wedges - 1 ½ cup (100g) chopped cabbage - 1 cup bean sprouts - ½ cup (100g) carrots, sliced - 2 servings of yakisoba noodles (pre-cooked) Toppings Bonito flakes, chopped green onion, as needed Sauce - 2 tbsp cooking sake/ rice wine - 1 tbsp soy sauce - 1 tbsp Worcestershire sauce/ tonkatsu sauce - 1 ½ tbsp oyster sauce Cooking oils and seasonings - 1 tsp high-heat oil - 1 tbsp toasted sesame oil - salt and freshly ground black pepper, to taste 1. Prepare Ingredients: - Slice the onion into 1cm wedges. - Cut cabbage and carrot into bite-sized pieces. - Thinly slice tofu into bite-sized pieces. - Mix the sauce ingredients into a bowl. 2. Cook Yakisoba Noodles: - Heat 1 tbsp of sesame oil in a frying pan. - Spread out the yakisoba noodles in the pan and cook until they get a crispy, golden texture. Press them down with a spatula to ensure an even cook. - Flip the noodles over and cook the other side. Once they have finished cooking, set aside. 3. Cook Tofu and Vegetables: - Clean the pan then heat 1 tsp of oil. - Add cabbage, onion, carrots and a pinch of salt. Sauté them all together for about 5 min. Add in the tofu and stir for one more minute. 4. Combine and Season: - Push all the ingredients to the edge of the pan, making a space in the center. - Add back in the cooked noodles to the pan. - Pour the mixed sauce over the noodles and toss, ensuring the noodles are well-coated. Allow the noodles to absorb the sauce before mixing them with the vegetables for a crunchier texture. Lastly add in the bean sprouts and stir-fry the entire mixture. - Season with salt and black pepper to taste. -Remove from heat and top with bonito flakes. 5. Finish and Serve: - Transfer to a serving dish and sprinkle on some chopped green onions. - Feel free to change up the vegetables. Green beans, carrots, and bok choy would be great options. -For non-vegan options, you can add sliced pork, chicken and shrimp. -Use a large size frying pan -The taste may become diluted depending on the amount of vegetables used therefore feel free to adjust the taste at the very end by adding in more salt or soy sauce. Store it in an airtight container in the fridge for 3 days. - MIWA's E-cookboo k s are available! I hope this will be helpful and enjoyable in your kitchen^^ -(NEW) MIWA's Tableware is NOW live! Enhance Your Culinary Experience with MIWA's Tableware! Miwa's Favorite Picks : Perfect for starting your Japanese food journey at home. Ideal for Celebrations and Gifts : Beautiful designs that make any occasion special. Enlighten Your Table : Add elegance and tradition to your dining experience. 2024/2/2 MIWA
- TUNA AND UME NOODLE SALAD/ ツナと梅のパスタサラダ
1 servings 10 minutes 5 minutes 1 can (80g) canned tuna 150g spaghetti /soba noodle (for 1 serving) 2-3 Umeboshi (plums with about 8% salt content), pitted and finely chopped 1 tablespoon soy sauce 3 lettuce leaves (about 100g) 4 shiso leaves (perilla leaves) 1 tablespoon Greek yogurt or Mayo 1/2 tablespoon olive oil 1. Remove pits from Umeboshi and finely chop them. In a large bowl, combine the canned tuna (including the juice), chopped Umeboshi, soy sauce, and Greek yogurt. Mix well until everything is mashed together. 2. Cut the lettuce leaves into strips about ½ inch wide and halve the length. Thinly slice the shiso leaves. 3. Bring water to a boil in a pot and add 2 teaspoons of salt (not included in the ingredient list). Cook the spaghetti according to the package instructions. Drain and rinse the spaghetti under cold water, then drain again thoroughly using a colander and pat dry with paper towels. If you are opting for soba noodle, no need to add salt. 4. Add the drained spaghetti to the bowl with the tuna mixture. Add olive oil and lettuce, and toss everything together until well combined. Serve in bowls and garnish with sliced shiso leaves. 1 . Feel free to use your favorite leafy greens in this recipe. Spinach, cucumber or watercress would also be delicious options. 2. Soba noodles are also tasty substitutes for spaghetti in this dish. Store it in an airtight container in the fridge for 2 days. - MIWA's E-cookboo k s are available! I hope this will be helpful and enjoyable in your kitchen^^ -(NEW) MIWA's Tableware is NOW live! Enhance Your Culinary Experience with MIWA's Tableware! Miwa's Favorite Picks : Perfect for starting your Japanese food journey at home. Ideal for Celebrations and Gifts : Beautiful designs that make any occasion special. Enlighten Your Table : Add elegance and tradition to your dining experience. 2024/04/06 MIWA
<Yield> 2 servings 4 minutes 7 minutes 4 eggs 1 cup carrots, Julienne 1 tablespoon natural oil 1 teaspoon granulated sugar ½ teaspoon Kombu dashi powder / vegetable dashi powder / dashi powder ¼ teaspoon salt S oy sauce (optional) ★Find Japanese ingredients here . 1. Cut the carrots into thin match sticks. Whisk the eggs. 2. In a pan heat the oil. Add in the carrots and salt. Sauté until the carrots have softened. Season then with the sugar and stock powder. 2. Pour the beaten eggs into the pan and gently mix them together with the carrots. While the egg is still runny, remove from heat and transfer the egg scramble to a plate. Drizzle with some soy sauce if it’s needed. ※Watch more on YouTube! 1. Other than carrots, you can use other vegetables such as onion and red peppers. 2. Feel free to add additional oil before you pour in the egg if necessary. Store in an air-tight container in the fridge for up to 3 days. This Carrot egg scramble is great to be served in this tableware . - MIWA's E-cookboo k s are available! I hope this will be helpful and enjoyable in your kitchen^^ -(NEW) MIWA's Tableware is NOW live! Enhance Your Culinary Experience with MIWA's Tableware! Miwa's Favorite Picks : Perfect for starting your Japanese food journey at home. Ideal for Celebrations and Gifts : Beautiful designs that make any occasion special. Enlighten Your Table : Add elegance and tradition to your dining experience. 2021/04/31 MIWA
- SHIO KOJI
6 mins 0 mins 200g Koji / rice malt 60g salt 250ml water 1; Mix koji and salt with your hand until it’s combined. 2; Pour water then mix until everything is well incorporated. 3; Transfer to the container. Let it sit at a room temperature for about 7-9days.During the fermentation process, make sure the lid is partially covered and mix them from the bottom to top once a day. 4; After the fermentation process is over, close the lid completely and keep it in the fridge. 1;When the koji is easily mashed with your finger, it’s ready. Keep in an air-tight container in the fridge for 2 weeks. - MIWA's E-cookboo k s are available! I hope this will be helpful and enjoyable in your kitchen^^ -(NEW) MIWA's Tableware is NOW live! Enhance Your Culinary Experience with MIWA's Tableware! Miwa's Favorite Picks : Perfect for starting your Japanese food journey at home. Ideal for Celebrations and Gifts : Beautiful designs that make any occasion special. Enlighten Your Table : Add elegance and tradition to your dining experience. 2021/11/27 MIWA